Tuesday 7 August 2012

Software to record any sound from your PC


I had earlier mentioned about Freecorder which is a browser-based audio grabbing tool. My friends and readers have told me that the program works good but it eats up their viewable space in the browser.

So, for all of you I am here with a software which can record any sound that you can hear from your PC. Its called MP3 MyMP3 Recorder. It is indeed a free software and it can save the audio in wav and mp3 formats.


Check the following link for the software. 

http://www.mp3mymp3.com/mp3_my_mp3_recorder.html


That's it!
Feel free to rate,comment & subscribe.Thanks!

Saturday 28 July 2012

Command Prompt on Right-Click


Many computer users, specially the programmers, need to launch a command prompt window every once in a while to execute some dos/shell commands. The problem is, when a command prompt window launched, the default path is normally the system path or the user profile's path. The users will then have to do all the "cd" commands to change the directories to the path he/she wants.
This trick shows you how to add an option called "Command Prompt" when you right-click on a folder in Windows. With this option, a Command Prompt Window will launch and its current directory will be the path to the folder you've selected.
Use this trick at your own risk.
Here's what you'll get:


The Solution
You can either edit your registry OR download the registry file and apply it on your computer.
Method I. Manually edit the registry:
  1. Start > Run
  2. Enter "regedit" and hit Enter
  3. Expand to "HKEY_LOCAL_MACHINE\SOFTWARE\Classes\Folder\shell"
  4. Right-click on "shell" and select New > Key
  5. Make sure a new key is created under "shell". Change the name of this key to "Command Prompt"
  6. Right-click on this new key "Command Prompt" and select New > Key
  7. Change the name of this key to "command"
  8. Here's what we should have: 
  9. Double-click on the "(Default)" text on the right window to bring up the edit box
  10. Enter this text into the Value Data field:
    cmd.exe "%1"
  11. Click OK and close the registry.
Method II. Download and apply the registry file:
  1. Download this registry file Here
  2. Unzip it to a temp folder, then double-click on the .reg file to add the registry data.
That's it.
I hope you'll like this trick.
Feel free to rate,comment & subscribe.
Thanks!

Friday 27 July 2012

How To Untag Yourself From a Photo on Facebook


Your friend recently posted a picture on Facebook and tagged you on it. That’s nice! But what if that is the picture you don’t like? It will appear in your pictures on Facebook whether you like it or now. There is only one way to get rid of this issue. Untag yourself from that picture.

How To Remove Tag From a Picture on Facebook

remove tag facebook untagGo to your Profile page. Then click on the View Photos of Me link under your profile pic. Locate the picture that you don’t like in it. Then click it. Under this photo, there will be a list of all the people who have been tagged in it. Find out your name in it, and then click on the remove tag link in the brackets. That’s it. You have just untagged yourself from a photo and it will no longer appear in your pictures.
[Note that after you have untagged yourself from a picture, the picture will still be there in your friend's album. It will just not appear in your pictures]

That's all.
I hope you'll like this trick.
Feel free to rate,comment & subscribe.Thanks!

How To Disable / Stop the Facebook Chat Sound


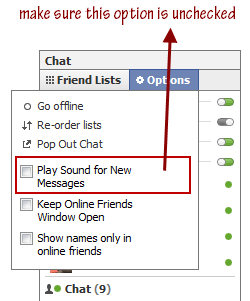
stop facebook chat soundRecently Facebook changed the chat message notification sound. The new ‘ding’ sound is really annoying sometimes. But you can easily disable the Facebook chat sound.
To stop the Facebook chat notification sound, click on the “Chat” link in the bottom right corner on your Facebook home page. In the pop up chat window, click on the “Options” link.
In the Options menu, uncheck the option that says, Play Sound for New Messages. That’s it. Now you will never hear the pop up chat sound.
To enable the Facebook chat sound again, just check the “Play Sound for New Messages” option again.


That's all.
I hope you'll like this trick.
Feel free to rate,comment & subscribe.Thanks!

How To Hide Your Birthday on Your Facebook Profile


If you are uncomfortable with the fact that your date of birth is publicly visible on Facebook, then you can easily hide it from your Facebook profile. You can also hide just the year of your birth and display only the date if you don’t want everyone to know your age. Here’s the procedure to hide your birthday on Facebook.
1. Login to your Facebook account and go the edit profile page.
2. In this page, the basic information tab will be selected by default. Here, look for the Birthday option. There are three options available in the drop down menu there,
  • Show my full date of birth in my profile
  • Show only month and date in my profile
  • Don’t show my birthday in my profile
These options are self explanatory. Choose the one you like most but since you came here looking for the method to hide your birthday on Facebook, just select ‘Don’t show my birthday in my profile’ option.
hide birthday facebook
Once you are done, scroll down and click on the ‘Save Changes’ button. That’s it. Now your birthday will not be displayed publicly (not even to your Facebook friends).
That's it.
Feel free to rate,comment & subscribe.Thanks!

Who Deleted You From Their Friends List on Facebook?


Do you want to know who removed you from her/his friends list on Facebook? You may have come across many Facebook apps that claim to tell you who deleted you from their friends list. But the truth is that none of them actually work. They are all fake/scams as it is against Facebook TOS for app developers to monitor friends. Facebook will immediately suspend any app that tries to tell you who removed you as a friend.
The only way to monitor this is to do this outside Facebook. Fortunately, there is a way, the Facebook Unfriend Finder. Unfriend Finder is a script that helps you monitor people who have deleted you from their friend list. Installation of this script is very easy. You can see the instructions for all the browsers here.
I recommend using Firefox with greasemonkey and using Unfriend Finder as a greasemonkey script. Learn all about installing and using greasemonkey scripts on firefox, and then download Unfriend Finder and install it in Firefox.
After the installation, you will see a new menu, Unfriends, on Facebook.
facebook unfriend find who deleted you as friend
You won’t see anything when you click on this menu option now. But rest assured that it has started to monitor your friends. If you see a drop in your friends count after you have installed this script, then click on the Unfriends to see who has removed you as friends.
I hope you'll love this post.
Feel free to rate,comment & subscribe.Thanks!

Complete Guide to Installing and Using Greasemonkey Userscripts in Firefox


greasemonkey logoGreasemonkey is a Firefox add-on/extension that allows you to install userscripts that alter the web pages on the fly when you visit them. There are innumerable uses of Greasemonkey. It can be used to fix rendering bugs, add new functionality to web pages, breaking captchas, aggregate data from multiple web pages etc. In this how-to Guide you’ll learn how you can start using Greasemonkey userscripts in Firefox.

Installing Greasemonkey in Firefox

Before installing and using userscripts, you have to first install the userscripts interpretor in the Firefox, which is the Greasemonkey add on. Here’s step by step procedure to install Greasemonkey in Firefox -
1. Go to Greasemonkey page on the Firefox add-ons site and click on Add To Firefox button.
2. A new pop up dialog box will appear on which the Install Now button will be deactivated, to prevent you from a security vulnerability. It will be activated automatically after about three seconds seconds. Click on Install Now button to start the installation of Greasemonkey.
greasemonkey installation steps3. After the installation, the installer will ask you to restart the Firefox. Click on Restart Firefox button to do this. After the Firefox starts, a confirmation dialog will be shown that 1 new add-on, that is, Greasemonkey, has been installed. Look at the lower right corner of Firefox now. You’ll notice a small monkey icon there indicating that the Greasemonkey has been installed and is ready to work.

Understanding UserScripts

The Greasemonkey plugin, by itself, does nothing. You will notice no change in the behavior of Firefox after installing Greasemonkey. All its functionality comes only after installing appropriate userscripts.
A userscript is basically a JavaScript file that ends in .user.js extension and follows some specific syntactical conventions. Every userscript is written to do a very specific purpose, when installed in Firefox, with Greasemonkey plugin installed. You can browse through thousands of userscripts at Userscripts.org.

Installing Userscripts From Web

To install a userscript in Firefox, first make sure that Greasemonkey add-on is installed (obviously). Then click on the link on the web page that points to the userscript.
For example, if you are installing user script from userscripts.org, simply click on the link that says Install,
This will open the installation dialog box of Firefox. Click on Install button to complete the installation of the userscript.
Note – On the install dialog box there are a few more things, like the include and exclude rules, the Show Script Source button etc. These things are for userscripts developers and you can use userscripts easily without knowing anything about these things. Just keep the default options selected!

Troubleshooting Userscripts’ Installation

Sometimes the install dialog box is not displayed on clicking the userscript link. In this case, one of the following cases will be applicable to you,
1. The userscript’s source code is displayed in a new tab with a pop up install button, like this,
greasemonkey pop up in firefox
If this is the case, just click on the install button on the install button pop up bar to complete the installation.
2. Sometimes, on clicking the userscripts’ link, the script simply open in a new tab with no pop up install bar, like this,
greasemonkey userscript installation
In this case, click on Tools > Greasemonky >Install User Script to install this userscript.

Installing Userscripts From Your Computer

You can install the userscript from web only if the URL of the installation link ends with .user.js extension. If it doesn’t ends with this extension then the Greasemonkey plugin will not detect this script, and won’t display any of the installation options described above.
If this is the case, then save the userscript on your computer (File > Save As) and rename it as anyNameYouLike.user.js. Then right click on the file and click on Open With > Firefox. If you are on Linux, then just open this script using the File > Open dialog of Firefox, and click on the install button on the pop up bar to finish the installation.
Again, like above, if the pop up bar with an install button doesn’t appears, then click on Tools > Greasemonky > Install User Script to install this userscript.
Now that you know all about installing and using Greasemonkey userscripts in Firefox, visit Userscripts.org to check out all the available userscripts. If you don’t want to browse through the thousands of available userscripts, then just subscribe to Hacktrixto get notified about really cool userscripts, whenever they are released.

How To Download a Backup Copy of All Your Facebook Data


Do you want to backup everything that you posted on Facebook? You can actually download all your data from Facebook including your wall posts, messages, profile info, photos, videos etc. in a single zip file. You can then browse through all your Facebook stuff locally. Here’s the procedure,

How To Download and Backup All Your Facebook Data:

1. Login to your facebook account and go to Account > Account Settings in the top right menu.
2. On Account Settings page, scroll down to find the option that says, Download your information. Click on the learn more button and then click on the Download button on next page.
3. After clicking the download button, Facebook will send you the download link on the email address that is associated with your Facebook account. Click on this link, enter your Facebook password and download the zip file that contains all your Facebook data.
Here’s an official video tutorial that explains the above procedure in detail,
Once you have the backup zip file, you can extract it locally. Then click on the index.html file in the extracted folder to browse through all your Facebook data locally.
I hope you'll love this trick.
Feel free to rate,comment & subscribe.Thanks!

How To Print A Poster of All Your Facebook Friends


How To Print All Your Facebook Friends on a PosterPrintingFacebook is a cool web service that lets you print a poster containing the profile picks of all your Facebook friends.
Using this tool you can easily create customized Facebook Friends Poster and then paste it on your wall, that is, the actual wall of your room, and not the Facebook wall :). You can also create a poster from all the fans of a Facebook page or Group.
PrintingFacebook is created by Benjamin Lotan. This service is very easy to use. Just visit the website, and connect it with your Facebook account. It will then fetch all the profile pics of your Facebook friends. You can then customize the look and feel of the poster by changing the spacing between the pics, background color etc.
After finishing the design, just pay by paypal to get the poster shipped to you. The cost is $20, and $6.00 for shipping in US.
The poster will be printed on Fuji Crystal Archive photo paper, and will be printed using a RA-4 photochemical process. In simple words, it means that it will be a high resolution poster. The size of the poster will be 20 inch by 40 inch. Get your Facebook Friends Poster Now!
Still confused?
Here's a video tutorial:

I hope you'll love this post.
Feel free to rate,comment & subscribe.Thanks!

Facebook Account Temporarily Unavailable – Problem and Solution


Are you worried that you can’t access your Facebook profile and seeing an error like,
Facebook Account Temporarily Unavailable
Your account is temporarily unavailable due to site maintenance. It should be available again within a few hours. We apologize for the inconvenience
Account temporarily unavailable
Your account is currently unavailable due to a site issue. We expect this to be resolved shortly. Please try again in a few minutes.
Sorry, this profile is not available at the moment. Please try again shortly.
If your Facebook account is not available and you are seeing any of the above messages when you open Facebook, than there is nothing to worry.
As the messages say, your Facebook account is temporarily unavailable because either Facebook is doing some site maintenance, or it is facing bandwidth issues. In any case, your Facebook profile should be up and running within an hour or less.
If you can’t access your Facebook profile even after an hour, then ask around to your local friends if they can open their Facebook accounts. If they can’t then probably its a bigger site maintenance task, so try again after some time.
However, if all your local friends can open their Facebook profile and only you are seeing the Facebook Account Temporarily Unavailable message, then try clearing your browser’s cache and cookies to fix the issue.
If your Facebook profile is still unavailable after many days, then send an email to info@facebook.com, appeals@facebook.com or disabled@facebook.com and explain them the issue. Once you send them an email, your account will be available again soon.
I hope this will help you out.
Feel free to rate,comment & subscribe.Thanks!

Monday 23 July 2012

10 Reasons Why You Should Not Buy China Tablets Devices


I am going to explain Why you should not buy a china company tablets if these tablets are cheap then why cheap and what’s the worth, i given up to 5 reasons below with explanation what are bad things in Chinese tablets and why you should not buy it.

Think 100 times before buying a China company’s tablets.

1. Stolen design:

The Chinese tablets have totally stolen design when any Asus or Samsung company launch new tablet in market or if they display the design Chinese companies start copying that, they stole design and make cheap prices tablets and it is illegal source.

2. Illegal license Software:

Chinese Tablets use illegal and stolen or theft license software like they used android 2.3 and 4.0 and 4.1 jellybean on new chinese tablets even they don’t have officially license for the use Google Android software to their tablets

3.No software updates or access to Play Store:

There is no option in android software for regular or free updates, and no choice to update from market if new apps ill release it would work only on new version if you have old version your couldn’t update your version and your tablet is wasted, instead if you buy Good company tablet like Asus 810, Nexus 7, or Samsung then it would be better choice you can update regularly and can access every thing.
And there is also no access to official android market or Google play store, there is some new chinese tablete who are offering google play store access, but it is limited access because Chinese android tablet can’t be updates so its waste

4.Bad display & touch input:

The Chinese tablets have many size of screen resolution and secreen size they show 10″ screen size but screen size is 10″ actual but resolution or display size will be 8′” , and color schemes are also bad quality and low colors.
And About touch , touch system is too much bad and hard, we have to press finger with much power on screen bad touch input.

5.Low Ram and Big Storage:

Mostly Chinese tablets have 128 Mb ram or 256 mb but they provide storage 8 Gb or 16 Gb the 8to16 Gb storage need big ram other wise tablet will hanging out it will work too much slow.

6.Bad and Low Quality battery Cell:

Chinese tablets have almost 2100 mAh battery cell and you know how much it will give you battery time ? in starting it will give you 2+ hour but when you ill install some Android Apps and Games it will give you less than 1 hour battery time.

7.Bad or Fake Specification Display:

They Given Fake Specification on Display many of sites just copying pasting specification they even don’t know what is the actual specification if Chinese can make theft and stolen license tablets then they can not display fake description ? Interesting you can understand what i am trying to say or what i have to mean.

8. Low resale value:

If You will go for buy a Chinese Tablet its prices range starting from almost 125+$ to 400$ if you will buy a tablet for 200$ then you keep it in your mind you wouldn’t able to sale it in market its have 0% value in market they can buy it for 50$ or less it , only you can sell it like faking or fooling someone.

9. No Warranty Issue or Claim:

No Warranty and no Grantee mostly tablets go dead 1st day , because it is made on very low quality base if it will damage or gone dead then your money is wasted .

10. Heating up quickly:

When ever you will start a playing game it will heat up quickly because it dose not have big ram so it’s processor will heat up and can be dead in time.
And many more things which are not built in Chinese tablets, like Some Chinese Tablets have not Speakers and some tablets have not built in Bluetooth and some tablets have not GSM sim card support etc.
So Be careful!
Feel free to rate,comment & share.Thanks!

Google Announces Android 4.1 Jelly Bean Now A Test Drive To Next Generation Android Technology

Google has announced to launch android 4.1 jelly bean.Android 4.0 Ice cream sandwich was the latest version by android it has also many new features and its gone better but now android 4.1 jelly bean is launches with new powerful features its has alot of new features. All explained below.

So Read What is better have in Android Jelly bean Why should we choose this version of Android Operating System.

Widgets:

In Android jelly bean Os mobiles have new kind of Home Screen its upgraded with new Features, its officially full customization. the clock is Changes and Phone Buttons and Default short keys are upgraded and Home Widgets many kinds of can add all your widgets which are belong to apps direct to Home screen.
Keyboard :
The Typing experience in android 4.1 jelly bean has improved. Google added new features and More Languages, 18 + Languages added officially in Keyboard like Hindi and Arabic and Urdu.
Voice search :
voice typing now works in offline mode. This means one can type with voice, without worrying about the data consumption.  Google Updated Voice search, Easy to search with Voice.
Notifications :
The new Great and improved notifications bar added to jelly bean it notify the all things without launching the  app. now its work auto and notify you everything.
Camera :
The Camera Options and Colors have been updated More Effects and Color schemes are added to camera option in android jelly bean.
Updates and Release
It will update to new devices at mid July in Google Nexus and Motorola Xoom Tablets they will be 1st tablet and devices for Android 4.1 jelly bean.
This is the All about New Jelly bean Feature the more Information Will be added to this post as soon, I am collecting Data and correct information for you.If you like then feel free to rate,comment & subscribe.Thanks!

Friday 20 July 2012

Your Own Home Server


An Introduction


In this tutorial you will learn how to step up your own server. This server will be comprised of Apache 1.3.5, PHP 4.2.0, and MySQL 3.23.49. This tutorial will address the basic setup of a server on your own computer. This means the removal of hassles of dealing with the company that is running a remote web server. It will be easy to modify. You can add any thing you want to it, be it CGI/Perl, Zope, Roxen, etc, all by your self. You will have unlimited disk space, well at least as big as your hard drive is =) Now that you know the advantages, it is time that I tell you what i used, and what you will need.


What I used
* Windows 2000 - NOTE that if you are using 2k you WILL NEED Administrative Privileges. If you don't then get them somehow =) If you are on 95, 98, NT, XP, ME, I
* Apache 1.3.6 - I tried to use 2.0 but I could not get it work. I also feel that 1.3.6 is tried and true, so why mess with greatness.
* Mysql 3.23.49 - The newest version of MySQL when I set up my server. MySQL also the is the best PHP supported Database, and well love PHP don't we.
* PHP 4.2.1 - The latest and greatest PHP release. -nt


What you will need
* Apache 2 - Link: h**p://www.apache.org/dist/
* Mysql 3.23.49 - Link: h**p://www.mysql.com/downloads/mysql-3.23.html
* PHP 4.2.0 - Link: h**p://www.php.net/downloads.php
* Windows - This tutorial is ONLY written for new versions of Windows.


Once you have downloaded all the programs you are ready to continue.


1. Installing Apache


Installing Apache


The first step is to download Apache for Windows. Before you install it make sure that any other server software is removed. Remove it all via the control panel.On


Once you have clicked on the executable, a screen should com up that looks like this. Go ahead and click on next


user posted image


Of course you plan to abide be the license agreement, so click on I accept.... and click on next.


user posted image


You really don't need to read this, but if you want you can. Read it if you want feel informed. When you are ready click on next.


user posted image


Here is where the actual setup of Apache begins. For Network Domain put in localhost as for Server Name You want these both to be localhost because the server is running locally, on your computer. It doesn't matter what is in email field, just put in yours. No one will no it because it's just you.


user posted image


For the sake of this tutorial it is better to just leave it as it is because, later in the tutorial I will show you how to start the server with one click of the mouse, and for the sake of ease, it will be easier for you to follow along. You can change it if you want, but you will have to realize where to substitute it. For me the root drive is E: but for you will probably be C:


user posted image


Once you have all the jazz set up, it is time to install the server. If you are on w2k or XP be sure that you have Administrative permissions or you will get an error about half way through the install saving cannot access msvrt32.dll or something. If you get that error run it again when you have admin privileges. Once you are ready click on install.


user posted image


If all went well you just see a screen similar to this. Now it is time to test the install of apache. Click on Start > Program Files > Apache HTTP Server and look for start Start Apache in Console. Click it. Once it says Apache XXXXX running, press Windows Key + R and type -http://localhost/. If the install works you should see a page saying that it works. If all is set and done, continue to the next step.


user posted image
______________________________________________________________________
2. Installing PHP
Once you have clicked on the executable, a screen should come up that looks like this. Go ahead and click on next.


user posted image


Of course you plan to abide be the license agreement, so click on I accept.... and click on next.


user posted image


For this information, we will want the simple standard install. Chances are you if you are reading this tutorial, you will probably not even want to talk about advanced =)


user posted image


This is the mail setup, just enter localhost, and me@localhost.com. These are not important, because you, the admin, are the only person that will use the server, and you will be the one handling errors.


user posted image


We are going to want this install to work is Apache, so click on Apache, and move on.


user posted image


Once you have all the jazz set up, it is time to install the server. If you are on w2k or XP be sure that you have Administrative permission or you will get an error about half way through the install saving cannot access msvrt32.dll or something. If you get that error run it again when you have admin privileges. Once you are ready click on install.


user posted image


After the install is done you should get something that says you will have to manually configure apache to use php. Assuming you have a working Apache server installed, make sure that it is not running. Navigate to C:\Program Files\Apache Group\Apache\conf\ open the httpd.conf file. Note that you can also get to the http.conf from the start menu. Start > Program File > Apache HTTP Server > Configure Apache Server > Edit the Apache httpd.conf Configuration File and the window will open up in notepad. Now hit Ctrl + End if you see something like what follows, you can skip this step. If you do not see that code, copy it. This code will only work if you used the default install folder when you installed php. If you did, copy that code and paste it into the end of the file. Select the code to right, and hit crtl + c , then go into the httpd.conf file and hit ctrl + v and save the file.


ScriptAlias /php/ "c:/php/"


AddType application/x-httpd-php .php .phtml


Action application/x-httpd-php "/php/php.exe"


Now that we have php installed, it is time to test it. Open up notepad and type the code to the right. Save it as phpinfo.php. Remember to set it as all files in the drop down menu, or the file will be a text file. Save in the Directory: C:\Program Files\Apache Group\Apache\htdocs. htdocs is the directory where all the files go. You can create endless dir's and browse them. For Example E:\Program Files\Apache Group\Apache\htdocs\mydir\myfile.php could be accessed as http://localhost/mydir/myfile.php. Once you have that file saved. You will need to start the Server. Click: Start > Program File > Apache HTTP Server >; and look for something like Start Apache in Console. After you have found it, launch it. You should get a window saying that Apache is running. Now go to Start > Run > and type in -http://localhost/phpinfo.php. If you don't see anything, php is not installed correctly. If php is installed correctly, you will see a few large tables, displaying php's configuration. Now Your are 1/2 done!
______________________________________________________________________
3. Installing MySQL
Once you have clicked on the executable, a screen should com up that looks like this. Go ahead and click on next.


user posted image


Of course you plan to abide be the license agreement, so click on I accept.... and click on next.


Just like before you should leave the default dir alone, so you will be able to follow along with me when I show you how to start and stop all the aspects of the server.


Stay with the typical installation. Just like before, if you don't have admin privileges, the install will be faulty. After you click next, the install will begin. After the install has finished, move on to the next step.


Now you have to set up the root account. The root account is the absolute admin of the system, the highest possible. Click on Start > Run and type cmd to open up the command prompt. You are going to have to navigate to where MySQL is installed. Type C: > Enter > cd mysql > Enter > cd bin > Enter. Now you have to tell setup the root settings. Type mysqladmin -uroot password InsertYourPasswordHere then hit enter.


To see an image of the screen, -h**p://www.webmasterstop.com/tutorials/images/doscreen1.gif


What is the point of having a database if you can't easily administer it! That is where phpMyAdmin comes into play. phpMyAdmin is a free piece of software written in php that makes the administration of a mysql or many other types of databases easy. You will want to download (h**p://prdownloads.sourceforge.net/phpmyadmin/phpMyAdmin-2.2.6-php.zip?downloadrelease_id=85832)the latest version. Save it in the htdocs folder. Once it is done downloading it, right click on it and select Extract > To Here. When it is done you should end up with a directory in the htdocs folder called phpMyAdmin-2.2.6 To make it easier to access, rename it to phpMyAdmin. After you have renamed it, click on it and look for a file called config.inc Open it. This is where you set the configuration of phpMyAdmin. When you open it up, it should look similar to the image to your side. On yours there should be a few things missing. The $cfgPmaAbsoulteUrl and $cfgservers[$i]['password']. You will need to fill those in between the quotes. for the $cfgPmaAbsoulteUrl enter -http://localhost/phpMyAdmin/ if you followed my instructions to the letter. If you did not rename it or extracted to a different directory, put that in there. For the $cfgservers[$i]['password'] enter the password you entered when you were setting MySQL in the set above. You can refer to the image for help. After you have put the right things in save the file.


To see an image of the screen, -h**p://www.webmasterstop.com/tutorials/images/phpmyadminscreen1.gif


Now we want to test the install of mysql, php, phpmyadmin, and apache all at once. Start apache in console like we did before. Now, you are going to need to start mysql. For myself I made a file that would start mysql for me. Open notepad and type: start c:\mysql\bin\mysqld-nt.exe --standalone and save that as Start MySQL.bat. Once you have saved it, click it. A window should open and then close. Mysql is now running on your computer. After mysql and apache are started go to run again and type -http://localhost/phpMyAdmin/index.php and if everything is installed correctly phpmyadmin should so up. You are almost done! Now we have the easy part =)


4. Finishing it all up


Wow! We mad it through the whole process. Now we want to simplify the whole process of controlling the server. I made a toolbar with all the things I needed. I made a new folder on my desktop and called it Server Folder and put all the stuff there. I made a new shortcut and gave it a value of -http://localhost/ made a shortcut to the PHP Documentation page. Another shortcut to my php editor, which is now unavailable. The phpMyAdmin shortcut is set to -http://localhost/phpMyAdmin/index.php. I made another shortcut htdocs. I moved the Start Apache in Console program that was in the start menu folder and moved it to the server folder. You can take the Start Mysql file you made in the last page and move it to the new folder. After you have put all the desired things into that folder, right click on a blank space in stat menu task bar (where the program boxes lie) and select Toolbars > New Toolbar and navigate to the folder. Voila!


Now all you have to do is click Start Apache in Console , Start Mysql, and Lauch browser biggrin.gif


Here You Are Guys 

Yahoo Messenger, No Ads


I went into the system registery and found out that Yahoo! moved the 'banner url' key to a slightly different location. Than what it used in version 5.5!


Yahoo! IM no longer uses 'YUrl', but uses 'View' instead. You gotta click on each key inside of 'View' and edit the 'banner url' string to anything you want... I simply cleared mine out completely and it works flawlessly!


Here is what you gotta do:


Run regedit
Goto HKEY_CURRENT_USER -> Software -> Yahoo -> Pager -> View


Inside the 'View' key there are a several other keys... go through each one and edit the 'banner url' string to your liking. It even works if the string is left blank (this causes it to look as if ads were never even implemented)! 


Restart Yahoo! IM for the effect to take hold.


This is great for Yahoo! IM 5.6 users who don't want to be bothered with ads. feel free to rate,comment & subscribe.Thanks!